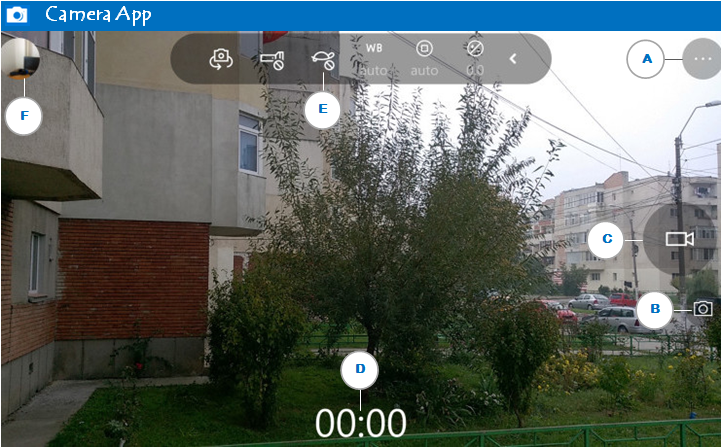
With the built-in Camera app in Windows 10 you can take pictures, record videos or stream video while video chatting. If your computer has a built-in camera or a connected webcam, you can use the Camera app to take photos and videos. It is available for Windows 10 PCs, tablets, and phones. One of the fastest methods to launch the Camera app is to use the search feature offered by Cortana. Click or tap on Cortana’s search box from the taskbar and type in the word “camera”. Then, click or tap on the Camera app. If this is the first time you have launched the Camera app, the app may ask you to allow it to use your camera and your microphone, as well as your location. Once you have allowed the Camera app to use your devices, you should see an image of what’s in front of the camera.
Settings
The Camera app has some advanced settings available for you to change. To access them, click or tap on the “three dots” button (A) from the top right corner of the app. Then, on the app’s menu, click or tap the Settings entry. The Camera app displays a series of settings which you can change as you see fit. Note that some of these settings might differ for you, depending on what camera you own and what options its driver offers.Take Pictures
On the right side of the Camera app you will find two buttons: one for taking photos (B) and one for recording videos (C). You’ll notice that one of these buttons is bigger than the other. The bigger button shows you the mode that’s currently on. All you have to do in order to take a picture with your camera is to click or tap the Photo button. Note that, if the Camera app was in Video mode, you will have to click twice on the Photo button: initially to switch to the Photo mode and then to take the photo.Record Videos
In order to record videos with the Camera app from Windows 10, you first have to switch to Video mode. Click or tap the Video button (C) from the right side of the app’s window. Then, to start recording a video with the Camera app, click or tap the Video button again. Once you start recording a video, the Camera app displays a stopwatch (D) on the bottom of the video, which tells you the time that has passed since you started recording. To stop a video recording, click or tap the same Video button from the right side of the app.Adjust Brightness
The Camera app in Windows 10 allows you to manually set the brightness, or exposure, of the photos and videos you take with it. To do that, click or tap on the arrow button on the top center of the Camera app, in order to enter the Pro mode. Once you are in Pro mode, on the top center of the Camera app, you will get a new button for controlling the brightness. Click or tap on it. Once you click or tap the Brightness button, the Camera app displays a manual slider on the right side of the window. With the mouse or with your finger, move the slider upwards to brighten your photos and videos or move it downwards to darken them.Set Timer
The Camera app also allows you to set up a Photo timer for taking pictures automatically, a couple of seconds after you hit the Photo button (B). To access the Photo timer, open the app’s configuration menu. Click or tap on the “three dots” button (A) from the top right corner of the app. If you don’t see them, move the mouse cursor to the top right corner of the app and they will show up. The Camera app displays a menu on its right side. Click or tap the Photo timer entry. The Photo timer lets you take photos with a Delay of 2, 5 or 10 seconds and it also lets you set the Camera app to continuously take photos using the time frame you selected. After selecting the settings you want, click or tap the OK button (represented by a small tick) from the bottom of the menu to apply them. Or, press the Cancel button (a small cross) if you have changed your mind. If you chose to enable the “Continue taking photos every [2, 5 or 10] seconds [...]” setting, you have to press the Photo button in order to stop the Camera app from taking photos automatically, after you start the photo taking process by pressing the same Photo button. If you enabled the Photo timer, each time you take a photo, the Camera app displays a timer that shows you when the photo is actually captured.

No comments:
Post a Comment